
So, I finally got around to trying out those glitter french tips I’ve been thinking about. Saw some ideas, looked kinda cool, thought I’d give it a shot myself. Here’s how it went down.
Prep and Base
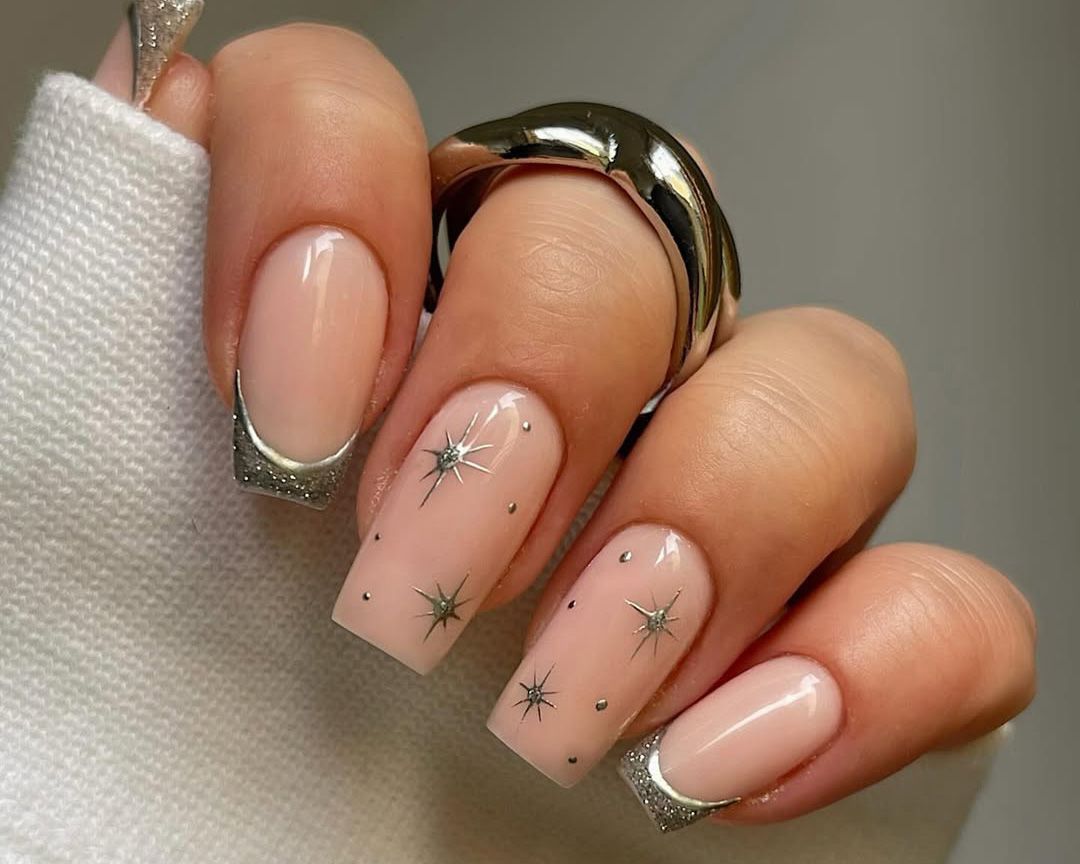
First, I gathered all my bits and pieces. You know, the usual nail kit suspects: base coat, a neutral polish for the main nail color – I went with a sort of milky pink this time – and of course, the glitter. I didn’t have a specific glitter polish thin enough for a tip, so I grabbed a pot of fine silver glitter I had lying around from some old craft project. And a decent top coat, that’s crucial.
Started by cleaning up my nails. Filed them into a shape I liked, pushed back the cuticles, wiped them clean. Standard procedure. Then applied one layer of my usual base coat. Gotta protect the nail, right? Let that dry completely while I figured out my plan of attack for the glitter part.
Getting the Glitter On
Once the base was dry, I put on two thin coats of the milky pink polish. Waited for that to dry fully. Really waited. Like, watched half an episode of something waited. Rushing this part always ends in disaster for me.
Okay, glitter time. This was the bit I wasn’t sure about. I decided against trying to paint a line with glitter polish because mine are usually quite thick. Instead, I used some nail guide strips I had – those little curved sticker things? Stuck one on each nail, leaving the tip exposed.
Then, I painted a thin layer of clear polish just on the exposed tip, above the sticker guide. While it was still wet, I carefully dipped the very tip of my nail into the pot of loose silver glitter. Had to be careful not to dunk the whole finger in. Just a gentle press into the glitter.
Getting an even coat of glitter took a bit of practice. Some tips needed a second dab. I tried to tap off the excess glitter gently before it dried too much. Then, the slightly nerve-wracking part: peeling off the guide sticker while the clear polish was still a bit tacky but not totally wet. Pulled it off slowly. It worked okay! The line wasn’t razor sharp like a pro would do, but it was definitely a glittery french tip.
- Clean the nail
- Apply base coat, let dry
- Apply neutral color, let dry (really dry!)
- Place nail guide sticker
- Paint clear polish on the tip
- Dip wet tip in loose glitter
- Tap off excess
- Carefully remove sticker
Repeated this for all nails. Took a bit of time, not gonna lie. More fiddly than a standard paint job.
Sealing the Deal
After I’d done all ten tips and let them set for a few minutes, I finished everything off with a generous layer of top coat. I sort of floated the brush over the glitter tip first, to avoid dragging sparkles all over the nail, then did the full nail. It smoothed out the slight texture of the glitter quite well. Added a second layer of top coat after the first one dried, just for extra durability and shine.
Cleaned up the little bits of stray glitter around my cuticles with a cotton bud dipped in remover. And that was it. Honestly, pretty happy with how they turned out. The silver glitter tip catches the light nicely against the pale pink. It’s a fun look. Took more effort than I thought, but yeah, I’d probably do it again for a special occasion or something.
