
Alright, let’s talk about my recent adventure with an AP watch, specifically the Royal Oak. I’m no expert, just a regular guy who likes tinkering and figured, why not give this a shot?

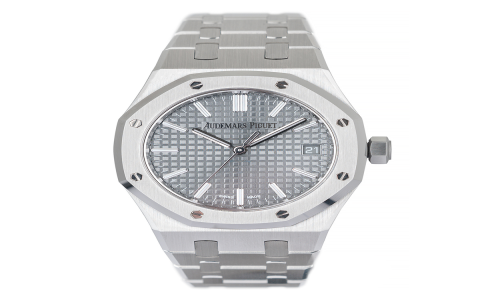
So, it all started when I saw a Royal Oak online and thought, “Damn, that’s a good-looking watch.” But, you know, the price tag is insane. So, I did what any self-respecting tinkerer would do – I decided to see if I could get my hands on a decent replica and maybe, just maybe, mod it a bit.
- First things first, I spent a good week researching different replicas online. There are tons of them out there, and the quality varies wildly. I finally settled on one that seemed to have decent reviews and, more importantly, had a movement that I could potentially work with.
Once the watch arrived, the real fun began. My first impression? It was…okay. Definitely not the real deal, but not terrible either. The bracelet felt a bit cheap, and the finishing wasn’t exactly mind-blowing. But hey, I wasn’t expecting perfection.
Tearing it Down: This was the scary part. I’ve worked on watches before, but nothing quite like this. I took my time, watched a ton of YouTube videos, and armed myself with the right tools. Slowly but surely, I disassembled the watch. The key was to be organized and take pictures of every step – trust me, you’ll need them when you try to put it back together.
The Movement: The movement was the heart of the operation. I wanted to see if I could regulate it to improve its accuracy. It took some patience and a steady hand, but after a few hours, I managed to get it running pretty consistently. Not perfect, but definitely better than it was out of the box.
Bracelet Blues: The bracelet was a weak point. It felt flimsy and the clasp was a bit wonky. I considered replacing it altogether, but then I decided to try and improve it. I spent hours polishing the links and tightening the screws. It made a noticeable difference – the bracelet felt much more solid and the clasp was more secure.

Polishing and Finishing
The case and bezel needed some love too. The original finishing was a bit rough, so I spent a good amount of time polishing and brushing the surfaces. It was tedious work, but it really paid off. The watch looked much more refined after a good polish.
- One of the things I really wanted to improve was the dial. The replica dial was okay, but it lacked the depth and detail of the original Royal Oak. I ended up finding a custom dial online that was a much closer match to the real thing. Swapping it out was a bit tricky, but it made a huge difference in the overall look of the watch.
Putting it Back Together: This was the moment of truth. After all the modifications and improvements, it was time to reassemble the watch. I carefully followed my pictures and took my time, making sure everything was properly aligned and secured. It took a few hours, but finally, it was done.
The end result? I was actually pretty happy with it. It wasn’t perfect, and it definitely wasn’t a real Royal Oak, but it was a significant improvement over the original replica. It looked better, felt better, and ran more accurately. Plus, I learned a ton in the process.
Would I do it again? Absolutely. It was a challenging but rewarding project, and it gave me a newfound appreciation for the craftsmanship that goes into a high-end watch.