
Okay so here’s the deal – I saw all these videos claiming lip gloss alone can make your lips look way bigger. Seriously? Just gloss? Seemed like clickbait to me. But hey, I had a tube chilling in my bag, so I figured, why not try it myself? Worst case, I’m sticky for an hour. Let me walk you through what I actually did step-by-step.

First Thing First – The Prep
I grabbed my basic clear, slightly sticky lip gloss. Nothing fancy, just drugstore stuff. Then I looked in the bathroom mirror. Yeah, my lips… kinda average, right? Not super thin, not Angelina Jolie either. Perfect test subjects. I took a plain ‘before’ selfie, no smile, dead-on. Gotta have proof.
Playing Around With Placement
My first dumb thought was just smear tons on. Big mistake. Like, really bad. It looked messy, felt gross, and pooled in the corners. Zero plump effect. Total fail. Okay, rethink.
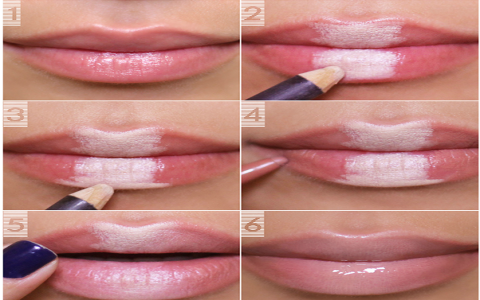
Next, I tried putting just a tiny dot right in the very center of my bottom lip. Like, smack dab in the middle. And you know what? When I pressed my lips together gently, it kinda spread outwards on its own. It gave this subtle, juicy focus right at the center. Okay, promising! Not huge, but definitely more… alive? Marked that down as Trick 1: Center Focus Dot.
Getting Sneaky With The Shine
Just the center dot wasn’t enough for that “full lip” look though. I started experimenting with where the light hits. See, gloss is shiny, right? Light bounces off it. So I took the applicator and very carefully dabbed extra gloss only on the plumpest part of my top lip – that little curve in the middle (the Cupid’s bow?) and right on the middle of the bottom lip again. I avoided the very outer edges. Suddenly, the light was catching right where lips look fullest naturally. That was Trick 2: Highlight the High Points. Much better than gooping it everywhere.
The Blending Move
I noticed when I pressed my lips together too hard after applying, the gloss kinda squished out towards the edges. Ew. But then I thought, what if I did that on purpose, but controlled? So I applied gloss mainly to the inner half of my lips. Then, instead of a firm press, I did this soft little blotting motion with my lips – just barely touching. It pushed some gloss just slightly over my natural lip line in those inner areas, without looking messy. It blurred the edge a tiny bit. Tricky to get right without going overboard! But when it worked? Trick 3: Blot to Blur. Subtle overline effect.

Shape Matters Too
Then I remembered something kinda obvious. Shiny gloss on smooth skin looks fuller than on chapped skin. Duh. I hadn’t exfoliated! I gently rubbed my lips with a damp washcloth. It felt better instantly. Trick 4: Smooth Canvas. Essential.
The Cool Tingle Trick? Sorta.
I don’t have any super “plumping” gloss with mint or cinnamon. Mine was just basic. But I had this idea… I popped an ice cube in my mouth for like 10 seconds. Just swished the cold water around my lips. Brushed my teeth with mint toothpaste? Basically trying anything cold or tingly. Honestly, it sorta worked? My lips looked a bit flushed and puffy for a few minutes right after. Maybe the blood flow thing? Felt weird, though. Trick 5: Temporary Swell. Mild effect, kinda uncomfortable. Probably skip this next time.
Did It Actually Work?
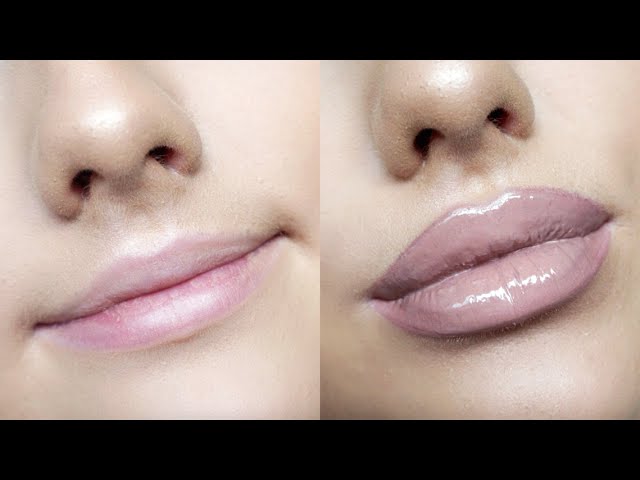
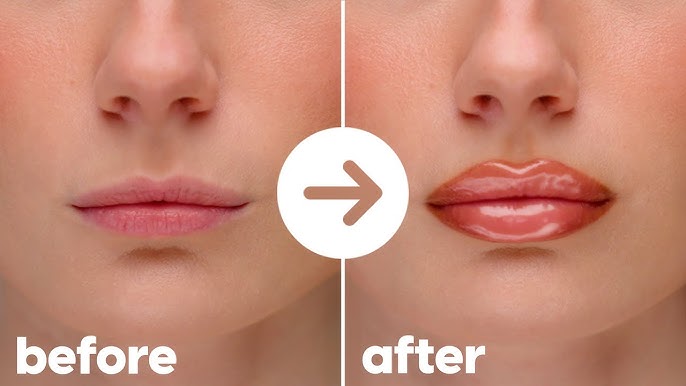
Okay, final verdict after playing makeup chemist for an hour. Am I suddenly a Kylie Jenner dupe? Heck no. But did my lips look noticeably fuller and juicier in the after selfie compared to the deadpan before pic? Absolutely yes.
Combining the center dot + focusing gloss on the high points + the gentle blot/blur on prepped lips (smooth canvas) made a real difference. The gloss reflected light perfectly to fake that plump look. The ice trick was gimmicky. Honestly, this made me appreciate my simple gloss way more. No crazy tools, just using what I have smarter. Worth trying!