
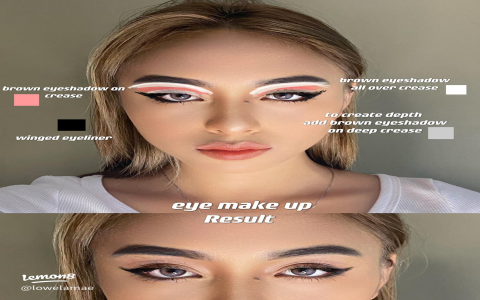
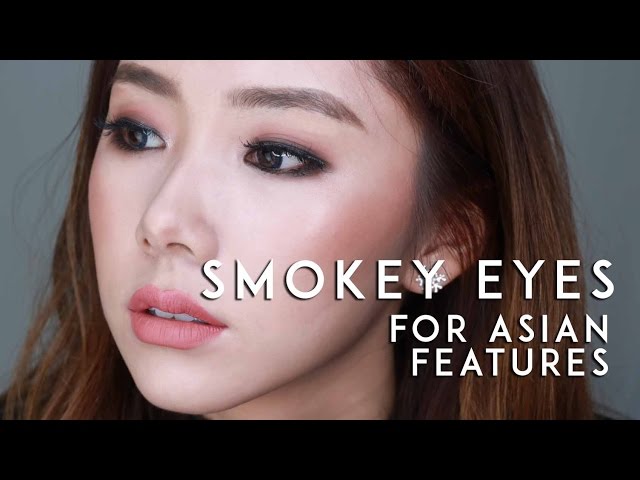
Trying Out That Smokey Eye Thing
Okay, so I finally decided to give this whole smokey eye thing a real try. You see it everywhere, looks cool, but honestly, on my eyes? Asian eyes, you know? Not a lot of lid space, sometimes monolids playing peekaboo. I always thought it would just look like I got punched or hadn’t slept in weeks. But hey, gotta try, right? So, I gathered my stuff.

Getting Started – The Base Camp
First thing, I needed a clean slate. Washed my face, put on some moisturizer like usual. Then came the eyelid primer. I dug out one I bought ages ago. Slapped that on my lids. Felt a bit sticky, hoped it would actually do something to hold the shadow. Waited a bit for it to set. Patience isn’t my strong suit when I’m trying something new like this.
Laying Down the Color – The Scary Part
I grabbed my palette. Decided not to go full-on black right away. That seemed like asking for trouble. Picked a medium grey, kinda shimmery. Took a flat brush and started patting it onto my mobile lid. This is where it gets tricky. How high do you go? With my eyes open, you could barely see it. So I patted it a bit higher, kinda feeling for where my socket should be, maybe slightly above where my lid naturally folds when open.
Then blending. Oh boy, the blending. Took a fluffier brush and tried to soften the edges. It kinda just… spread everywhere? Looked muddy. Okay, deep breaths. Wiped some away with a cotton bud. Tried again, smaller circular motions. Focused on just blurring that top edge, not dragging the color way up to my eyebrow.
Adding the Smoke – Or Trying To
Next, the darker color. I picked a dark charcoal, almost black. Took a smaller, denser brush for this. The plan was to keep it really close to the lash line and the outer corner. I sort of drew a little sideways ‘V’ shape on the outer third of my lid, connecting it to the lash line. Then, more blending, but very carefully this time, trying to blend the dark into the grey without making one big grey-black mess.
- Packed dark shadow near lashes.
- Made a small ‘V’ shape outwards.
- Blended very gently into the grey.
It was… getting there? Still felt like it could go wrong any second.


Liner and Lower Lash Line – Defining the Edges
Time for eyeliner. I went with a black pencil liner first. Tightlined my upper waterline – makes a difference, trust me. Then lined my upper lash line, smudging it slightly with a brush to make it less harsh and more part of the smokey effect. Didn’t do a wing, felt like that might be too much.
For the lower lash line, I took that same dark charcoal shadow on a small smudger brush. Ran it along the outer two-thirds of my lower lashes. Connected it to the upper shadow at the outer corner. This part is easy to overdo. I tried to keep it light. Then I took the medium grey and smudged it just below the dark charcoal to soften it further down.
Finishing Touches – Mascara and Reality Check
Curled my lashes like my life depended on it. Stubborn straight Asian lashes, you know the drill. Piled on the mascara, top and bottom. Really focused on lifting those upper lashes. Skipped falsies for this first attempt, wanted to see the raw result.
The final look? Honestly, it wasn’t a total disaster. It wasn’t the super dramatic look you see in magazines, definitely more of a muted, wearable smoke. It didn’t make my eyes disappear, which was my main fear. Keeping the darkest color close to the lash line and not going too high with the blending seemed key. It took way longer than I thought, lots of fixing and adjusting. Would I do it every day? Probably not. But for a night out? Yeah, maybe. It’s doable, just gotta be patient and blend carefully, especially with limited lid space.