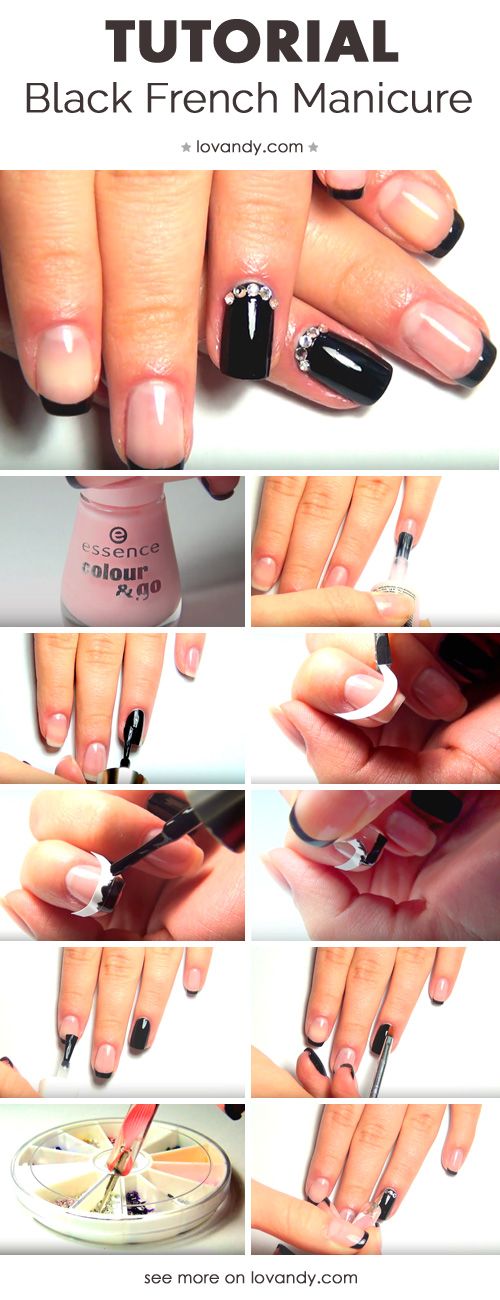
Hey everyone, so yesterday I decided to finally try those trendy black tip nails myself, right at home. Honestly, I was kinda nervous thinking it would be way too hard, you know? But seeing it everywhere got me pumped to give it a shot. Let me walk you through my kinda messy adventure.

Getting My Supplies Together
First thing, I had to dig through my nail stuff box. This is what I scrounged up:
- My trusty clear base coat (gotta have that!)
- A super shiny black nail polish – picked the darkest one I had
- A sheer nude polish, like a soft pinkish-beige, for the base
- Nail tape – the thin kind designed for doing lines
- A top coat to seal the deal and make it all shiny
- Nail polish remover and some pointy cotton swabs for the inevitable mistakes
- A little plastic dottie tool thing I found buried in there
The Actual Doing Part (Brace Yourselves)
Okay, washed my hands super clean first, dried ’em properly. Then I filed my nails into a simple short square shape. Nothing fancy. Started with the clear base coat. Painted on a thin layer and let it dry COMPLETELY. Learned that lesson the hard way before!
Next up, the nude polish. Dabbed on two coats, trying my best to keep it smooth. Let each coat dry forever in between – seriously, patience is not my strong suit, but I forced myself. Watched some funny videos to kill time.
Now, the slightly scary part: the black tips. Took out the nail tape. Carefully stuck a strip across each nail tip, kinda low down because I wanted a thin black line, not a fat french tip. Pressed it down real good to make sure no polish could sneak underneath. Got a bit wrinkly on one finger, had to pull it off and start over. Annoying!
Once the tape felt secure, I grabbed my black polish. Opened it carefully… and promptly knocked the brush against the bottle neck, getting blobs everywhere. Sigh. Wiped it off. Tried again. Painted the tips with the black, going right up to the tape edge. Used the brush and my dottie tool to try and get a clean curve. Some nails looked okay immediately? Others? Total hot mess. Black polish kinda seeped under the tape a little on my thumb. Grr.

Couldn’t peel the tape off right away! Had to wait for the black polish to be mostly dry but not rock hard. That took another age. Slowly, slowly peeled the tape off each nail. Held my breath. On some nails, perfection! Sharp line! On others? Jagged edges or seepage. Enter the cleanup crew: dipped my pointy cotton swab into remover and meticulously scraped off the messy bits. Tedious, but necessary.
Final Touches and What I Learned
Once the black tips looked halfway decent (and after letting them dry too), I slapped on a thick coat of top coat. Glided it over the whole nail, bridging the nude and black. Shazzam! Instantly shinier and felt like it pulled everything together, hiding minor sins.
Let the top coat dry forever and a day. Seriously, I didn’t touch anything for like an hour. Was it perfect? Nope. A couple of the black lines are a tiny bit thicker than others. There’s maybe one small bump. But you know what? From normal people distance? They look awesome! Super chic.
My big takeaways?
- Patience is EVERYTHING. Drying time between every step is crucial unless you want smudges and tears.
- Tape application matters. Press it down firmly and make sure it’s smooth.
- Cleanup is your friend. Don’t be afraid of the pointy cotton swab!
- Don’t expect salon-perfect. Embrace the slightly homemade charm. Seriously, it’s fine!
Honestly, it was a bit fiddly, but so satisfying to do it myself! Give it a go next time you’re bored. You might surprise yourself. Cheers!