So, I wanted to talk about this thing I’ve been working on for a while – getting that sort of ‘thin almond eye’ look. It’s a shape I always found really elegant, you know? But achieving it wasn’t straightforward for me, not at all.

I started off, like most people probably do, just watching videos and looking at pictures. Seemed easy enough on screen. First attempts? A total mess. I remember grabbing my trusty black eyeliner pencil, the one I used for everything, and trying to draw this sharp wing. Looked less ‘almond’ and more like I’d smudged dirt on my face.
Getting Down to Practice
Alright, I realized the pencil wasn’t cutting it for the sharpness I wanted. So, the next step was getting a liquid liner. That pen type with a really fine tip. This was a whole new challenge. My hands were shaky, the lines were wobbly. I spent ages in front of the mirror, wiping off and restarting. Honestly, it was frustrating.
Here’s what I started doing methodically:
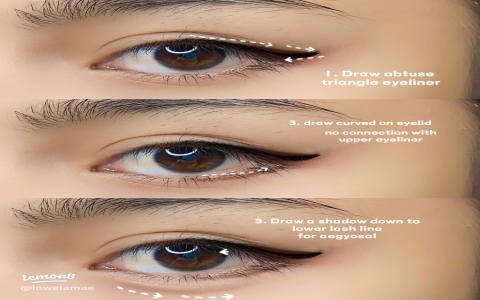
- Finding the Angle: Instead of just guessing, I started mapping out the angle. Like, imagining a line extending from my lower lash line upwards towards the end of my eyebrow. That became my guide for the flick.
- Thin Lines First: I stopped trying to draw the perfect thick wing in one go. I started with a very thin line right against my lashes, making it slightly thicker towards the outer corner. Then I’d draw the little flick using my imaginary guideline.
- Connecting the Dots: Once the flick was there, I’d draw another thin line from the tip of the flick back down to connect with the liner on my lash line, forming a tiny triangle. Then I’d fill that in. This gave me more control than just swiping it on.
- Eyeshadow Matters: This was a big one for me. Just liner wasn’t enough. I started using a neutral brown shadow, applying it in a sort of elongated shape, sweeping it outwards and slightly upwards from the outer corner of my eye. This helped create the illusion of length. No complicated cut creases, just a soft sweep outwards.
- Inner Corner Trick: I also found that keeping the inner part of the eye clean, or maybe just using a very light shimmer right in the inner corner, helped emphasize the elongated shape towards the outside.
Dealing with Reality
My eyelids are a bit hooded, especially as I’ve gotten older. This meant sometimes the liner would smudge or disappear when my eyes were open. The trick here was placing the liner just right, so the wing was still visible when my eye was relaxed and open. It meant the actual line sometimes looked a bit different when my eye was closed, but looked right when open. Took a lot of trial and error, let me tell you.
I also experimented with tightlining – applying liner to the upper waterline. This made my lash line look fuller without taking up precious lid space, helping with that defined but not heavy look.

Where I Am Now
It took consistent practice. Days when I just couldn’t get it right and wiped it all off. But eventually, I got the hang of it. It became muscle memory. Now, I can do a decent approximation of that thin almond shape pretty quickly. It’s not perfect every single time, who has time for that? But it’s a look I feel comfortable with and it actually works for my eye shape now.
It wasn’t about buying a ton of fancy products in the end. It was more about finding the right tools (a good liquid liner pen was key for me) and then just patiently practicing the technique, adjusting it for my own features. So yeah, that’s my little journey with the almond eye thing. Just kept trying stuff until something clicked.


